|
|
| |
|
| |
| Index |
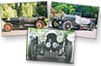
| Jim Pearce's Restoration Work On Chassis 869 |
| |
| October 22, 2015 to April 16, 2016 |
Bentley Three Litre VdP
Registration FY7290 Chassis 869
JEP Labour |
| |
- Receive and photograph car – check and photograph all parts.
- Remove and store parts, remove interior trim as required.
- Remove body complete and setup on trolley.
- Remove, wings running boards and all brackets.
- Remove bonnet, radiator, tie-bar, bulkhead and prop shaft.
- Photograph chassis and parts as required. Remove all wiring.
- Prepare chassis for collection and engine removal complete.
- Assemble and fit wing brackets and begin wing/running board setup.
- Align wings, running boards and all brackets to suit.
- Ratchet down chassis to agree correct spring settings/height.
- Finalise running boards - pack to make level as required.
- Adapt brackets and weld up holes in chassis to make same both sides.
- Shorten and re-weld front wings as required – make final alignment.
- Re-wire tail end of wings edges, secure and make good.
- Turn down new wing bolts to the correct size to suit.
- Finalise height and positioning of rear wings – adjust to suit.
- Fabricate new battery box in steel – fit and secure as required.
- Cut, shape and fit ash fillet to secure battery box to chassis.
- Cut and fit battery box lid to suit. Fit fluted aluminium edging.
- Make up and fit floorboard spacers complete.
- Calculate all specification for wiring. Order electrical parts and materials.
- Draw wiring diagram to suit. Measure up chassis for wiring looms.
- Make up front and rear wiring looms – in sleeving to suit.
- Repair and make good holes in bulkhead as discussed.
- Setup and check positioning of fuel tank – with spacers to suit.
- Modify spare wheel mounting brackets as required.
- Strip down car, mark up all brackets/parts – store as required.
- Strip out fuel tank and spare wheel bracket-work complete.
- Machine all heads of bolts – ready for re-fit. Strip down parts.
- Weld up all redundant holes in chassis – prep and make good.
- Prepare and fettle all brackets ready for paint shop.
- Drill out cast headlamp stanchions to accept wiring.
- Final fettle parts and list as required. Deliver to paint shop.
- Finalise wings ready for collection/delivery to painter.
- Pack and send shock absorbers to be overhauled.
- Begin bonnet repairs – fabricate new sections as needed.
- Rebuild missing sections of bonnet, fettle and make good.
- Sand and prep bonnet sections – ready for trial fitment.
- Cut access holes in fuel tank - knock out dents and creases.
- Pattern up and cut new cover plates for fuel tank.
- Remove and indent top tank fitment – make/fit infill plate.
- Dispatch chassis to chassis engineer and onwards to paint shop.
- All associate work.
- 18 gauge steel - battery box,
- Welding sundries
- Coach bolts - wings
- T - bolts - Running Boards
- De-greaser/Cleaner - chassis
- 14 gauge steel - fuel tank plates
- Packing materials – radiator & parts
- Cast Horn Bracket - bulkhead
- Welding Sundries - bulkhead repairs
- Fluted Ali edging - Bat box lid
- Stainless set screws - Bat box fixings
- Brass stock/washers - Bat box fixings
- Ash section - Bat box spacer/support
- Nuts, bolts & Sundries – as required
- Welding sundries - Engine Valances
- Ali fuel tank spacers/supports
- Ali spacers, studs/fitting – floor
- Wiring to include:-
- Cotton braid cable 8 amp/16/amp/44 amp. Bitumised sleeving.
- Heavy duty battery cable. Battery terminals/clamps.
- Lucas push/pull switches. Ring terminals. Battery master switch.
- Bosch horn push. Indicator switch. Brake light switch plus cover.
- Warning lamps – as required. Fuse box. Flasher unit. Relays.
- Junction boxes (four and six way). Dip switch.
- Polish new aluminium steering column tube – specialist
|
| |
| Engineering (Chassis) |
| |
Chassis Labour (First account)
- To unload car and generally check around chassis. Jack up chassis and support
- Making it level. Remove front wheels and brake drums. Remove both front brake
- Back plates, Perrot shaft, king pins and steering track rod. Remove front axle.
- Remove both front road springs and shackles. Disconnect rear brake rods, remove rear wheels and brake drums. Inspect brakes. Remove axle bolts and remove axle assembly. Disconnect rear springs, shackles and remove both rear springs. Make notes on damaged nuts/bolts and contaminated rear brake shoes etc. Remove front and rear shock absorber brackets, making new post for one bracket. Remove extra material from two brackets not required. Shot blast and refit brackets to chassis using new nuts. Remove rear axle locking rings and draw half-shafts. Clean and inspect. Remove nuts to axle differential casing and remove rear cover. Inspect cover and note damage, order new cover. Clean all nuts, bolts and gasket faces. Remove brake shoes along with Perrot shafts from front back plates so that they may be painted. Remove rear brake shoes, clean and pack. Send shoes to specialist for reline. Press off old bearings on half-shafts.
- And fit new bearings supplied. Make up and fit button to half-shaft as necessary. Remove rear brake levers and shafts, cleaning and freezing off as necessary. Weld one hole in rear lever and re-drill round. Rebuild rear brake shafts etc. Deliver front axle to specialist for straightening. Remove diff assembly from axle and clean, de-gasket all faces. Remove loose front chassis spring hanger brackets, clean and refit, split pin nuts. Overhaul track rod ends and for/aft rod ends, replacing balls, sockets and springs where necessary. Trial fit new axle back plate and machine internal parts as necessary to give clearances. Fit rear diff and back plate with new gaskets.
|
| |
| Chassis Labour (Second account) |
- To remove rear brake rods and clean fork ends. Order new rod material, fork ends, bottle screw and steering column tube. Collect axle from specialist. Make bands for rear brake drums. Make up new brake rods as necessary and re-tap threads in bottle screws etc. Deliver road springs to specialist. Collect polished steering column tube. Remove steering wheel, column and bracket. Remove damaged bracket from tube and take bracket to specialist for welding. Cut necessary slots into new column and aluminium tube. Secure centre steering column connection. Lubricate steering box and refit filler plug with new fibre washer. Paint all brackets with red oxide. Grease half-shaft bearings and refit half-shafts. Seal locking rings and secure. Rebuild steering column, supply new nuts and bolts as necessary. Collect road springs. Make new spring centre bolts as necessary. Secure front springs to chassis. Fit axle to springs loosely. Fit n/s stub axle with new King pin. Machine new spring shackle bolts as necessary. Secure front springs to chassis. Fit axle to springs loosely. Fit n/s stub axle with new king pin. Machine new spring shackle bushes to size and fit to rear springs. Fit and secure rear springs, making new side thrust washers as necessary. Lay rear axle onto springs and secure, split pin all nuts. Fit rear brake shoes and set spring pull poundage. Fit brake drum bands. Remove shafts in reverse brake levers, shot blast and clean, free off, lubricate and refit. Secure front axle, drill bolts and split pin nuts. Fit o/s stub axle with new top thrust bearing to king pin. Fit and secure brake back plates, split pin nuts. Attend to and free n/s perrot shaft and fit. Fit o/s perrot shaft. Refit front brake shoes and set correct poundage. Remove bolts securing front drums to hubs and fit new bolts the correct way round. Set up and fit front brake drums with fresh grease to bearings and new felt seals. Fit heat shrink to steering column and fit steering wheel with new pinch bolt. Inspect prop shaft. Fit all wheels.
|
| |
| Chassis Parts and Materials |
| 2 x track rod springs |
1 x front chassis tie bar |
| 1 x rear chassis tie bar |
4 x parrot shaft gaiter clips |
| 4 x shackle pin bushes |
8 x shackle pins |
| 6 x shackle pin nuts |
1 x steering column top hat bush |
| 3 x axle drain/filler plug fibre washers |
1 x axle inspection plug fibre washer |
| 4 x chassis tie bar washers |
1 x rear axle diff cover |
| 2 x rear axle diff gaskets |
6 x left hand brake rod nuts |
| 10 clevis pins |
1 x carriage |
| 2 x steering ball pins |
2 x steering ball pin cups |
| 2 x front hub felts |
4 x king pin felts |
| 1 x steering column outer tube |
8 x brake fork ends |
| 1 x length of un-machined brake rod |
2 x brake rod support bushes |
| 1 x brake rod bottle screw |
1 x carriage and sundries |
| 1 x Straighten front axle beam – specialist |
|
| 8 x relined brake shoes – rear |
1 x reset four road springs |
| 1 x repair steering column bracket |
1 x king pin |
| 1 x thrust bearing – king pin |
1 x sundries |
|
| |
Engineering (Engine)
- Engine testing, dismantling and inspection.
- Crankcase conversion for shell bearings.
- All associate work.
- Transport chassis for Engine removal @ Cost.
- Parts and Materials
- 1 x Three Litre Bentley Crankshaft
- 4 x connecting rods
- 1 x carriage
- 1 x Crankshaft main bolt set
- 16 x Valves
- 16 x valve guides
- 16 x valve springs (pair)
- 1 x Three Litre rocker set
- 4 x 80.00mm pistons
- 1 x Water Pump
- 6 x Steel Strongback
- 12 x Main bearing shells
- 3 x Crankshaft keys
- 2 x Taper pins
- 2 x Sump gaskets
- 1 x carriage/post & packing
Paint Work
- Items required to be BRG as follows:
- Wing/running board brackets. Battery & tool box
- Headlamp stirrups. Engine valances x 3 parts
- Spare wheel Bracket & A Frame. Coach bolts (wings)
- Hood rests - to be supplied (may be re-plated)
- Fuel tank - out of car (being repaired)
- Bonnet complete - Scotchbrite inside - repair/final fit prior to paint.
- Centre bonnet hinge to be de-riveted/removed & plated prior to primer/paint.
- All four wings - to include etch prime/stone chip/inside.
- Paint chassis Jag BRG to match wings/bonnet/parts.
- Springs will have gaiters fitted.
- Brake compensator cross bar removed prior to paint.
- Front/rear dumb irons + side chassis rails, prepped/primed & painted.
- Front/rear axles - primed/painted.
- Chassis internals primed/sprayed/hand painted.
- Prep & paint brake drums/backing plates - rear in-situ.
- Handbrake - inner section only.
- Brake rods/drop irons & connections.
- Steering arm/linkage.
- Shock absorber brackets - remove from chassis prior to paint.
- Shock absorbers - overhauled, will arrive primed.
- Parrot shaft castings brass. (front brakes).
- Starting handle and Sundries.
- Transport locally @ Cost.
Wheels and Tyres
- Supply new wheels and tyres complete, to include:-
- 5 x 21” 3 ¼” Top Quality Cold Rolled Rims
- 5 x 62mm Rudge Whitworh Hubs
- 5 x Butted spokes – 70 spoke
- 5 x Paint – Jaguar BR Green
- 5 x Stainless Steel bolts and washers (wheel weights)
- 5 x 525 x 21” Blockley Inner tubes
- 5 x Rim tape
- 1 x carriage – Pallet
Radiator
- Pressure check and flush. Remove small mark adjacent to badge.
- Flat and polish complete @ Cost.
Fuel Tank
- Shot blast fuel tank internally. Repair solder joints to mounting
- brackets. Fit, solder and seal access plates. Solder up top fitting.
- Pressure test as required – to include return carriage.
Shock Absorbers
- Strip, shot-blast and etch prime parts. Supply centre bushes, wooden
- friction discs, name-discs (103 type), centre bolts seals,
- flat spring washers, alloy blocks with bushes, wooden thrust
- washers, belville washers, tag washers, ½”bsf castle nuts,
- Plus new 103s 10” arm length in etch primer, thrust washers for
- mounting bolt, belville washers for mounting bolt,
- tag washers for mounting bolt.
- To include postage, packing and insurance.
|
| |
| April 16, 2016 to July 16, 2016 |
Bentley Three Litre VdP
Registration FY7290 Chassis 869
JEP Labour |
| |
- Continue with wiring looms. Make up and wire relay board under dash.
- Fit and connect Cut-Out and fuse box. Fit and connect rear chassis junction box.
- Make up and fit wiring clips to bulkhead - run wiring to suit.
- Strip brake rods and handbrake complete – send parts for plating.
- Assist repair of bronze differential seal, ready for specialist.
- Strip brake compensator levers and repair/replace worn levers (from stock).
- Part assemble and fit Autovac . Clean and de-grease parts, ready for paint.
- Clean fuel filter – send filter barrel for nickel plating as discussed.
- Make, paint and fit fuel pump mount. Identify fuel pumps (incorrect).
- Check brake rods for wear and repair as required. Prepare parts for paint.
- Degrease and clean gearbox complete. Prep and paint support brackets.
- Prepare and paint bulkhead head tape fittings. Fit new bonnet tape as required.
- Fit radiator and shock absorber mounts. Rust treat all springs to preserve.
- Trace and label wiring – ready for connection. Assemble mounting brackets.
- Fit wing and running board brackets. Route cables through front wing brackets.
- Make up new running board sections in hard wood – for improved fitment.
- Fit up running board brackets and make adjustments as required.
- Fit headlamp stirrups. Replace grease nipples. Fit and wire new fuel pumps.
- Re-fit gearbox mounts after cleaning. Fit body rubber to chassis.
- Paint underside of running boards and secure bonnet valances.
- Fit running board edging – make up new sections as required.
- Adjust and secure steering column and casting to suit.
- Make up and fit longer spacer tube to secure steering box bolt – within chassis.
- Fit grease impregnated Denzo tape to all road springs. Fit all gaiters supplied.
- Assemble and fit front and rear shock absorbers – secure/split pin complete.
- Cut and fit new rubber matting to running boards. Finalise battery box.
- Make up and solder pipework and connections for fuel lines and fitments.
- Clean pipework and fit as required. Bend and connect fuel filler pipe to suit.
- Refit brake compensator shaft after painting – free up moving parts.
- Fit and pin brake rods – ready for final adjustment. Refit body to car.
- Secure body to chassis and check alignment with bulkhead.
- Make up template and shaped hardwood blank for dashboard.
- Fabricate dash brackets and adjustment to suit. Sort and clean parts.
- Set final steering column position and adjust dash cut-out as required.
- Clean and polish steering column advance/retard/throttle levers.
- Clad dashboard in aluminium and pin in place. Flat/polish to satin finish.
- Fly cut holes for instruments and switch plate etc. Cover to protect.
- Trial fit dashboard to car – with support brackets to suit.
- Sort through remaining parts supplied. Fit radiator to car and adjust.
- Fit new radiator tape and cut/secure to suit. Clean out chassis sections.
- Paint insert and assemble handbrake lever, plus further brake rods/fittings.
- Clean and prepare car for photographs/dispatch for engine fitment.
- Square off chassis in running board brackets – paint heads as required.
- Refit fuel tank to car. Paint remaining brake levers and parts.
- Etch prime and paint chassis bolts as required. Make up final job list.
- Fit spare wheel mount brackets and finalise fuel tank fitment.
- Continue bonnet – cut and adjust to suit rad/bulkhead – weld as required.
- Fit steering column levers and bottom linkage to suit.
- Machine spare wheel mount casting. Continue bonnet alignment.
- Remove bonnet side hinges and de-rivet and weld up holes.
- Re-align bonnet hinges, re-drill and fit. Setup bonnet, file in to suit.
- Replace bonnet hinge pins with stainless – existing too small.
- Remove steering arm and replace for improved fitment.
- Remove wheel spinners and convert from chrome to nickel.
- Cut new toolbox lid, planed to depth with edging fitted.
- Re-fit dynamo and cover to suit. Finalise floorboard fixings.
- Make up and fit battery cables. Fill redundant holes in bonnet valances.
- Re-fit old steering arm for transport – new fitting sent for paint.
- Make up temporary fuel filler tube, with gaskets to suit.
- Prepare car for transport (for engine fitment). Store parts as required.
- All associate work.
|
| |
| JEP Materials |
- Electric fuel pumps (Push type – Neg Earth)
- P-clips and Electrical sundries
- Carriage on paint for wheels
- Nuts, bolts, washers, studding
- Copper fuel pipes, elbows and connections
- Bonnet tape – radiator & valances
- Grease nipples, further fuel fittings and tap
- Further 2K Jaguar BRG paint – for wheels & sundries
- Hard wood sections – running boards
- Black, flat fluted rubber matting – heavy duty
- Tapered castle nuts (flat faced) – shock absorbers
- Steering drag link – forged as original (with castle nut)
- Black rubber diver’s helmet tail lights – two off
- Starter switch, push switch & dash lamps
- Heavy duty battery (platinum Prestige)
- Adhesives and sundries as required
- Special long reach greasers in nickel – front axle
- Denzo tape & preservative – road springs
- Hard wood and aluminium - dashboard
- Further running board edging
- Stainless bonnet hinge pins – two off
|
| |
| Engineering (Chassis) |
Chassis Labour
- Remove gearbox lid, drain oil from box and lightly washout sludge.
- Refit drain plug with new washer and fill gearbox with fresh oil. Refit lid. Remove brake rods and handbrake, remove compensator shaft. Strip and clean compensator to free off sliding action. Load car and parts onto trailer. Strip propshaft, clean and inspect damaged parts. Take pins and housing to specialist for reconditioning, along with aluminium housing. Instruct specialist on repairs.
- Collect repaired items and assemble propshaft, free off tight spots as necessary. Trial fit aluminium cover and lightly machine to increase clearances on new flange. Travel to Wisborough Green to fit propshaft. Lubricate as necessary. Setup and compensate foot brakes.
|
| |
Chassis Parts and Materials
- 9 x pints EP 80/90 gear oil
- 1 x recondition front propshaft bushes and pins (specialist)
- 1 x manufacture and weld aluminium propshaft flange/cover (specialist)
- 1 x sundries as required
|
| |
Engineering (Engine)
- Labour
- Sump modification, repair and assembly
- Oil pump check, repair and assembly
- Pan sump plate repair
- Value and o/s guide fitting
- Oil drain tube fitting and assembly
- Crank oil gallery modification
- Fitting and assembly of water jacket,
- camshaft, roller valve rocker, vertical bevel gears.
- Transport chassis for Engine fitting @ cost
- Parts, Materials and Subcontract
- 4 x Cylinder liner
- 4 x Re-sleeve cylinder
- 2 x Oil drain tubes, nuts, washers, screws
- 1 x Top bevel gear set
- 2 x Magneto testing
- 2 x Rocker rods
- 6 x Cam chest stud ½” to 3/8”
- 5 x Helicoil
- Plus screws, nuts, washers, (various)
- Sealants, gaskets, etc.
- Steel stock
|
| |
| 1 x Brg LT1.1/8 |
1 x Brg LT1. ½ |
| 2 x Brg 7304BEP |
1 x Vertical drive lock washer |
| 1 x Castle nut 5/8” BSF |
16 x Ball tappets |
| 16 x Tappet nuts |
¼” Hard ground pins |
| 2 x Camshaft oil seals |
3 x ¾” Fibre washers |
| 2 x Block/cam chest gaskets |
1 x Block/crankcase gasket |
| 2 x Oilite bushes |
1 x cone clutch spring |
| 1 x clutch cone reline |
1 x carriage/p&p |
| 1 x Brg LT1.5/8 |
8 x 3/8” BSF castle nuts, washers |
1 x Set – clutch shaft, hub & spider (good 2nd)
1 x Set big end Brg shells
1 x Sloper carburettors, manifold, float chamber restoration |
|
| |
| Specialist Charges |
| |
Wheels and Tyres
- Paint 5 wheels in 2K Jaguar BR Green to match chassis
(additional charge to prepare & spray)
Instruments
- Restore Bezel Switch as necessary (parts & Labour)
- Cosmetically restore clock – to include new bevelled glass
- Fully restore flanged oil gauge – recalibrate and test
- Fully restore 5” AT Rev counter – fit new face
Plating
- Nickel plate and polish hand brake parts & fuel cap
- Include carriage
- Six month extension of IPR import licence (Cars UK - @ cost)
|
| |
| July 16, 2016 to August 16, 2016 |
Bentley Three Litre VdP
Registration FY7290 Chassis 869
JEP Labour |
| |
- Sort parts for final assembly and list work remaining.
- Fly cut holes in dash – make cut-outs for instruments.
- Prepare aluminium dashboard – first stage flat and polish.
- Flat and polish dash – apply 3 coats lacquer complete.
- Trim/modify leather over dashboard – to accept capping.
- Cut down bulkhead screws – as required.
- Fit and align instruments, fit and secure dash to car.
- Shape, fettle, polish and first fit aluminium scuttle capping.
- Adjust leather body piping to suit capping and tack off.
- Weld/extend exhaust pipe – prep and make good.
- Setup exhaust to check alignment – to suit manifold.
- Make up/fit bracket for fuel pump/fan switches.
- Fabricate/fit indicator switch bracket – drilled to suit.
- Connect magneto wiring – earth switch connections.
- Connect wiring under dash – to suit instruments.
- Make up further fuel lines – for engine bay/carbs.
- Finalise oil gauge pipe/connection and fit.
- Clean and prep engine and engine bay – remove sealant etc.
- Make up template for scuttle plate/toe board.
- Fit newly painted spare wheel boss – cut bolts and secure.
- De-rivet remaining bonnet hinge – prep/deliver parts to painter.
- Silver solder further fuel line fittings.
- Setup and fit rear wings, adjust running board – polish as required.
- Fit split pins to front and rear shock absorbers, plus hand brake.
- Final file and shape of aluminium scuttle rail.
- Test horn and repair horn – as was previously glued together.
- Strip down horn - paint, prep/re-paint, polish badge, make spacer & fit.
- Fit front wing brackets – cut down bolts etc. Further fuel pipe work
- Make up mounting brackets for cooling fan – fit/secure fan complete.
- Make up stud for spare wheel boss and back-face to suit.
- Cut and fit aluminium bulkhead plate – shape to suit.
- Fit rear lights and starter button to bulkhead.
- Make up spacers for dynamo. Sit and secure dynamo.
- Re-fit exhaust with new copper gaskets and brass nuts t silencer.
- Mix up paint/hardener – paint suspension parts, plus/bolts as required.
- Position and fit scuttle rail. Remove starter motor for check/repair.
- Make up remaining battery cables. Set up Magneto earths & starter button.
- Fit oil pressure help. Fit and connect temperature gauge.
- Fit dynamo drive coupling with fibre discs. Prepare car for visit.
- Wiring under dash – make up switch brackets to suit.
- All associate work.
|
| |
JEP Materials
- Ball pin and guide block – steering connection
- Bentley Tank badge – enamelled to suit radiator
- Solid aluminium 3/8” plate – scuttle capping/ fascia
- Electric cooling fan 10” – for radiator
- Side screen sockets, plus brackets to suit
- Further fuel pipe connections/fittings
- Lucas sidelights (front wings) in Nickel
- Brass exhaust nuts (long series) – Silencer
- Fibre disc couplings x 2 – Dynamo drive
- Magneto switch knobs and screws – switch plate
- Copper exhaust gaskets x 2 – silencer
- Length of exhaust pipe – to extend
- High temperature paint - exhaust
- Further nuts, bolts, washers, split pins
- Aluminium 1/8th plate – scuttle/toe board
- Clear etch lacquer – dashboard & capping
- Further electrical connections/sundries
- Paint remover, 2k black paint and lubricants
|
| |
| Engineering (Chassis) |
| |
Chassis Labour
- Travel to Wisborough Green, connect up and adjust Magnetos.
- Make up linkage for advance/retard, with half nuts to suit.
- Adjust and connect steering column control levers.
- All associate work.
- Chassis Parts and Materials
- Control rod stock, clevis ends, securing nuts.
- Lock wire, split pins, high temp grease.
- Nuts, bolts and sundries.
|
| |
| Engineering (Engine) |
Labour
- Engine assembly, clutch and ancillaries
- Bench test engine and fit to chassis.
- Transport chassis to Wisborough Green @ cost
- Parts, Materials and Subcontract
- 1 x clutch brake reline
- 8 x 5/16” BSF bolts and nuts
- 16 x 5/16” spring washers
- 1 x hex brass grease nipple
- 1 x woodruff key
- 10 x fibre washers
- 5 x copper exhaust manifold gaskets
- 1 x coolant system sealant
- 12 x stainless exhaust manifold nuts
- 1 x inlet manifold gasket 0.030”
- 16 x inlet manifold nuts
- 1 x 3/8” BSF brass cap nut
- 8 x spark plugs AB6
- 6 x HT conduit breakers
- 4 x rad./pump hoses
- 1 x al. flanged spigot
- 1 x pump gland packing
- 4 x cam cover gaskets
- 6 x copper pipe
- 1 x brass flange & 1. ¼” pipe
- 1 x oil filter conversion kit
- 2 x brass nipples, nuts, silver solder
- 6 x mikalor hose clamps, 2x steel clips
- 6 x cam cover dome nuts
- 1 engine oil (20W 50)
|
| |
| Specialist Charges |
Further Instruments
- Fully restore AT Speedo, to include new bearings.
- Restore and repaint case/rim, including fixings etc.
- Repaint needle, lubricate, recalibrate and test.
- Clean and refit original face.
- Supply correct flanged temperature gauge as required.
|
| |
| August 16, 2016 to October 26, 2016 |
Bentley Three Litre VdP
Registration FY7290 Chassis 869
JEP Labour |
| |
- Fit horn and dip switch to dashboard.
- Machine new door latches in brass.
- Refit and adjust doors & locks to suit.
- Fabricate bracket for battery master switch and paint.
- Cut hole in floorboard and position master switch to suit.
- Clean and paint floorboards.
- Sort plated parts, ready for dispatch.
- Strip down windscreen and remove glass.
- Delivery glass templates for new glass.
- Wiring to horn and dash lights.
- Make up new battery and HT cables.
- Make up and fit loom for rear lights.
- Prepare and paint wheel weight spacer discs.
- Fit and secure wheel weight spacers – incl. spare wheel.
- Drill out wheel weight washers to clear nuts on studs.
- Make up clamp and finalise brake light switch.
- Make up brackets for rear reflectors.
- Strip down and rebuild fuel cap reverse lever/mechanism.
- Put fuel in tank and pump through to carbs. Check for leaks.
- Make up new gaskets for fuel filter housing.
- Bend new pin beading for front seat backs and trim in leather.
- Fit and secure pin beading to front seats complete.
- Make up and fit gear gaiter in leather, with plinth to suit.
- Re-cut and bind carpet for improved gear gate clearance.
- Fit N/S door hinges and check strap. Collect bonnet parts.
- Rivet up hinges in bonnet tops and delivery to paint shop.
- Make new seat packers and turn down seat bolts.
- Fit and secure floorboards. Fit seat runners and catches.
- Prep and paint reflector brackets. Paint prop shaft.
- Fit running boards – cut down bolts etc. and secure.
- Split pinning component parts on chassis.
- Prep and paint number plate brackets.
- Rectify fuel leaks – re-set float levels in carbs.
- Modify greaser in Cardan shaft – to clear chassis.
- Fit and wire wiper motor. Fit copper washers to all greasers.
- Glue in side carpets. Tidy wiring connections under dash.
- Fit and secure speedometer cable. Paint fittings.
- Cut and fit under-felt for floor sections. Make up fuel cap seal.
- Cut, bind and fit carpets. Finalise wiring to rear lights.
- Fit and align centre bonnet hinge. Paint front seat bases.
- Fit strap to toolbox lid, cut and fit rubber matting. Paint bolts.
- Fit and secure fuel tank securing bolts - split pin nuts.
- Assemble bonnet catches, turn new spacers and re-fit.
- Replace bonnet tape – further alignment of bonnet.
- Adjust and finalise new steering arm – split pin nuts.
- Adjust and refit steering draglink – split pin caps.
- Check front wheel alignment and adjust as required.
- Set up badges on badge bar, make up spacers for clamps.
- Fit and secure badges complete – align to suit.
- Paint fuel cap B in red to suit tank badge.
- Jack up car and tighten wheels. Check tyre pressures.
- Clean, assemble and paint clutch brake parts supplied.
- Re-fit clutch brake mechanism to car and adjust.
- Setup number plates, position and fit clamps as required.
- Make up battery fixing brackets and studs, prime & paint.
- Re-fit and secure battery and fittings complete.
- Turn down bonnet valance nuts. Fabricate blanks for rad.
- Silver solder fuel lines and new fittings to suit.
- Clean all seating – clean and feed all leather complete.
- Fit up interior of car, re-fit and secure seating and runners.
- Position and fit Veltex carpet fasteners and fittings to suit.
- Pattern up and make leather gaiter for rear propshaft joint.
- Fit rear propshaft leather gaiter and wire into place.
- Top up radiator, setup fuel pumps and finalise connections.
- Fit and secure speedometer cable, connect as required.
- Split pin all nuts to front end of car and engine mounts.
- Prime and paint any bare metal nuts/bolts and fittings.
- Repair and reinstate steering column casting complete.
- Prepare and pair steering arm and associate fittings.
- Setup front wings for final fit – pack and adjust to suit.
- Cut and fit heel mat to front carpet – machine in place.
- Fabricate special made spacers to support headlamps.
- Swop headlamp stirrups over for improved alignment.
- Align and secure headlamps - adjust spacers to suit.
- Make wiring connections to headlamps and check.
- Fabricate special made side light bases to suit Lucas lamps.
- Assemble sidelights, silver solder flanges and fettle.
- Fit and finalise sidelights to front wings complete.
- Adjust o/s running board, cut down and paint fixing bolts.
- Continue securing wings, with rubber strip/packers to suit.
- Finalise toolbox – secure into running board complete.
- Cut, paint and fit chassis support tubes for headlamp stirrups.
- Run up engine and make running adjustments as needed.
- Re-set float levels, sort fuel leaks, clean and paint engine parts.
- Adjust ignition advance/retard and Magneto caps/timing.
- Jack up car and check steering linkage. Grease/oil king pins.
- Adjust dynamo brushes/casing for full output/charge.
- Remove and modify throttle pedal for improved fitment/use.
- Remove gearbox further to road test - ascertain fault.
- Assist chassis engineer to repair gearbox shaft and reinstate.
- Re-fit gearbox in car and connect transmission.
- Adjust clutch free play and recess toe boards for clearance.
- Re-instate floorboards, seating and carpets complete.
- Adjust brakes for improved brake pedal positioning.
- Remove remains of burnt paint from manifold and repaint.
- Position and secure parrot shaft clips. Re-adjust tyre pressures.
- Adjust clutch stop and actuation rollers – secure/split pin.
- Second test drive with chassis engineer, make further adjustments.
- Cut body frame to clear reverse lever block – paint/make good.
- Make leather sleeve and fit/secure fire extinguisher to scuttle rail.
- Fit pads on screen top glass to protect from wear on lower glass.
- Re-adjust aim of headlamps for improved beam focus/height.
- Sort and photograph parts to be packed and sent with car.
- Jack up car and re-check all nuts/fittings/chassis parts for tightness.
- Rectify further rattles as required. Lubricate all chassis greasers.
- Make up fuel dip stick with one gallon markers to suit (15 mpg approx).
- Road test car again, fill tank to capacity and check for leaks.
- Re-test car and make running adjustments/improvements as required.
- Check and lubricate magnetos, adjust and secure linkage.
- Align screws in running board edging. Modify and secure gear gaiter.
- Drill and tap windscreen stanchions for mirror brackets.
- Fit and secure mirrors complete – adjust as required.
- Cut and fit leather washers for mirror swivel brackets.
- Improve lumbar support to driver’s seat squab – adjust/make good.
- Fit further carpet fasteners in front carpet mat – to hold firmly in place.
- Finalise tonneau and fit press-studs to diver’s side.
- Fit lock wire to carburettor float chambers. Further road test – add fuel.
- Modify choke mechanism – make/fit spacer secure control knob.
- Re-check car after road test – secure and Loctite fittings.
- Fit and connect 12volt aux twin/USB socket as discussed.
- Tighten road spring fittings, fit split pins - turn down nuts as required.
- Further road test to ascertain fuel problem and continue running in.
- Make up new fuel filter housing in brass to resolve leak – polish and fit.
- Secure fuel filter stud in housing - make up further new gaskets to suit.
- Make up and fit bracket to support rev/speedo cables – under dash
- Further gearbox problem – remove, adjust and finalise to resolve.
- Prepare Bentley tools – de-grease, wire wheel and treat with ‘gun-blue’
- Reassemble car ready for further road test – check gearbox fixing secure.
- Change engine oil and filter – re-check oil level when cold.
- Remove rocker cover – check and adjust tappets as required.
- Make up new gasket for rev counter gear housing – fit/check and seal.
- Final 45 road mile successful test. Begin cleaning and presentation.
- Jack and lift car on axle stands – clean underside of car complete.
- Clean under all wings, clean wheels and tyres complete.
- Clean and present engine, bonnet and engine bay.
- Re-oil king pins and propshaft joint (with 80/90w gear oil).
- Make up and fit dog/luggage straps for the rear of car.
- Make final paint touch-ups, clean and polish car complete.
- Re-polish radiator and nickel plating. Make key ring for toolbox keys.
- Check and charge battery, re-check tyre pressures and sufficient fuel.
- Finalise and update parts list – pack and wrap parts for dispatch.
- Make up consignment note and instruction sheet as required.
- Final check and prepare car for dispatch. Load car and parts.
- All associate work.
|
| |
JEP Materials
- Back Acetal Rod – spare wheel weights. Spare spark plugs – to match existing
- Coach bolts – wing mountings. Oil Filters – two off. Postage on parts.
- Brass pin beading – Seating. Gasket sealant – black. Lucas 3 pin wiper motor
- Wiper blade & arm. Lucas 3-pin wiper Motor. Nickel Lucas badges – headlamps
- Badge bar clips x 4. Folder copper washers – greasers
- Trim and Engineering sundries. Cast Aluminium number plates
- 3/16” clevis & yoke/stainless rod – choke linkage
- High build & Etch primer – brackets
- Multipurpose grease – chassis lubrication
- Gearbox 80w90 oil – gearbox/propshaft
- Engine Oil – Castrol Classic 20w50
- Fire Extinguisher 1kg - Co2
- Heat resistance VHT paint – manifold
- Further Exhaust paint – black. Strap on toolbox lid.
- Carriage on plating – spare wheel spinner/parts
- Desmo mirrors and brackets – o/s & n/s – incl. postage
- 12 volt twin Aux/USB socket. Further carpet fasteners
- Suction mirror for screen. Rubber matting – toolbox.
- Trim sundries and adhesives. Green leather to suit existing
- K–Seal – Cooling system. Seat packers/spacers
- Brass section – side light and headlight bases
- HT bolts – fuel tank supports. Further under-felt
- Rear reflectors. Wheel weight washers.
- Saddle leather and fittings – hood and luggage straps
- Flat rubber strip – wing mounts
- Steel sections/fittings – drive cable support
- Fibre block – cable/capillary clamp – bulkhead
- Leather for prop shaft gaiter
- Stainless lock wire. Keys – tool box
- Satin black paint – floor and fittings
- Autosol polish – radiator and fittings
- Cleaning, electrical and general sundries to complete
- Fuel charges - road test
- Bentley tools:- Grease gun, BSA spanners, screw drivers x2,
- pliers x2, box spanners, ring spanners, King Dick adjustable,
- hub nut spanner, Lodge spark plugs, centre punch, fuses, file,
- plus new hammer and copper/hide mallet to suit.
|
| |
Engineering (Chassis)
Chassis Labour
- Attend Wisborough Green, check gearbox as stuck in 3rd gear. Assist with removal of gearbox. Remove main shaft and secure loose keyway rivet. Rebuild box and re-fit. Fill with fresh oil supplied. Attend to exhaust manifold gasket. Road test car. Re-visit to adjust clutch actuation rollers, Adjust/finalise brake and handbrake linkages, adjust foot brake, road test car again. Clear fuel blockage, adjust mixture and slow running. All associate work.
|
| |
Specialist Charges
- Sign Writer – Travel and Charges ‘RobBea’
- Bentley - The Vintage Years (Clare Hay) @ cost
- Strip plating - head & sidelight backs (incl. return)
- Nickel plate spare wheel spinner, door catches & screws
- Laminate laser cut windscreen glass – top frames
- Further paintwork – additional repairs/prep as required
- Paint brackets, headlamp backs, sidelights, flat and polish
- wings and panels complete.
- Materials as required
|
| |
| Posted here on Feb 13, 2017 |
| |
| |
| |
| |
| |
| |
|
 |
 |
 |
Sep 30, 2020 - Info and photograph received from Simon Hunt for Chassis No. RL3439 |
|
|
Sep 30, 2020 - Info and photographs received from Dick Clay for Chassis No. 147 |
|
|
Sep 29, 2020 - Info and photographs received from Ernst Jan Krudop for his Chassis No. AX1651 |
|
|
Sep 28, 2020 - Info and photographs received from Lars Hedborg
for his Chassis No. KL3590 |
|
|
Sep 25, 2020 - Info and photograph added for Registration No. XV 3207 |
|
|
Sep 24, 2020 - Info and photograph added for Registration No. YM 7165 |
|
| [More] |
|
|
|
|
|
|
|
|
 |
|
|
CLUB TALK
Upcoming Vintage Bentley Events |
|
|
|
|
 |
|
|
|
|
| |
|